Vegetable Pakoras

One of my favourite Indian foods are pakoras. I love this crispy, spicy, snack. It’s perfect as part of a meal, but equally good as a savoury treat. Eaten all over the Indian subcontinent they are a great way of using up bits of different vegetables, working well with cauliflower, courgettes, onions, potatoes, spinach, chard, aubergine…the list goes on. An added bonus for our family is that they’re inherently gluten free, due to their use of gram flour.

Simple in method, they do however need a few different herbs and spices to achieve the perfect pakora. For some, this would require a trip to the supermarket, or local ethnic shop (or both) to stock up on the necessary ingredients. I love having a range of spices in my cupboard, but sometimes the convenience of a spice mix is a godsend.  When I was recently contacted by Hari Ghotra about her Pakora curry kit, I thought I’d check it out.

The kit comes with all the spices and gram flour combined, and instuctions to make both vegetable and paneer pakora. There’s also a link to a video showing the process involved, but the recipe on the card is clear and easy to follow.  As mentioned before, pakora are very versatile, so I chose to use up a glut of courgettes, as well as some potatoes and onions. I love growing courgettes at the allotment, but if you look away for a moment, they seem  to grow in seconds, so another way to use them up is always handy. The one thing with using courgettes is that they have a lot of liquid in them, so after grating them they need to be squeezed of excess water, before combining them with the rest of the mix. Once your mixture is combined, it needs to be used pretty quickly, dropping spoonfuls into hot oil and frying until golden brown.

For a recipe which includes the spices needed to recreate the mix, see Hari Ghotra’s website, where you’ll also find a rnage of different curry kits and recipes to try. As a handy store cupboard emergency pack, these are pretty good. They certainly make it easy to turn a glut into a tasty, spicy treat.

Roasted Carrot and Cumin Soup with Labneh

With weather a little colder in the last few days, and certainly as a way of warming up after yet another drenching, soup is firmly back on the menu. Our carrots at the allotment have been pretty good this year, but due to the clay soil I only every grow small varieties like Chantenay  and Paris Market. Although this means I have a good amount of carrots, their small size also results in their being eaten up speedily. All this means we don’t have any carrots in storage. However, the other day I was given a load of carrots by a friend, with the mission of turning them into something yummy. My go-to use for a carrot glut is carrot and coriander soup, but we’d had that last week, so an alternative was needed. Roasting the carrots was needed to get the best of their (slightly past their best) flavour, so I added some cumin, onions and garlic when they went in the oven. The resulting spiced carrots made the perfect base for a sweet, spiced warming soup. Topped with cool slightly sharp Labneh it was just what was needed.

You will need

700g carrots, peeled and roughly chopped (larger chunks take longer to roast, so vary times accordingly)
3 cloves of garlic
1 onion (chopped into eighths)
Salt & Pepper
2 tsp of cumin seeds (slightly crushed)
drizzle of olive oil
1l good chicken stock
Labneh, freshcoriander and zaatar to serve – I made my own labneh, by straining 450g of yoghurt with a pinch of salt overnight.

Preheat the oven to 200˚C. Add the chopped carrots, garlic and onions to an oven tray, sprinkle with the cumin, salt and pepper and olive oil. Toss the vegetables to ensure they are all covered in the oil and seasoning. Roast for 30 mins or until partly browned. Once the carrots have started to caramelise, pour them into a saucepan and add 1l stock. Bring to the boil and simmer until the vegetables are soft and tender. Whizz in the food processor and adjust seasoning as necessary.

Serve the hot soup with a spoonful of the labneh (or Greek yoghurt if you want) and a sprinkling of zaatar and fresh chopped coriander.

Autumnal Root Vegetable Salad with Goats Cheese and Lentils

During the spring and summer, there’s not much more I like than to have a fresh salad, using what I can find at the allotment to make a delicious lunch. As the weather cools and the days get shorter (and wetter it seems), my love of the salad is replaced by a desire to eat warm comforting food like jacket potatoes, stews, and soup. However, the root vegetables are often at their best during this period and I’ve become to realise that they are just as good in a salad as a juicy tomato, or crunchy cucumber. When roasted, their inherent sweet earthiness is perfect to team with the slightly bitter leaves of chicory or rocket, providing both a fresh and comforting taste. So today, I’m having an autumnal salad of roasted carrot and beetroot, green lentils and a little goats cheese. Perfect.

roasted veg salad

You will need (for two people)

2 medium sized beetroot chopped into eighths
2 medium carrots, cut into small chunks
1 crisp apple, cored and cut into eighths
1tsp. caraway seed
dash of olive oil
100g Goats cheese

For the lentils
100g green lentils
1 bay leaf
350ml water (or vegetable stock)
A small handful of finely chopped parsley

For the dressing
3tbsp olive oil (I used the drained oil from the roasted vegetables)
1tbsp lemon juice
1 tsp Dijon mustard
1/2 clove of garlic crushed (I used a roasted clove of garlic I put in with the vegetables)
1/4 tbsp honey
pinch of salt and a few twists of black pepper

Preheat the oven to 200°C, then toss the chopped vegetables in a roasting tin with the caraway seeds and olive oil. Roast in the oven until soft and slightly caramelised; depending on the size and variety of your roots they may need different times, I tend to start with the beetroot, add the carrots 10 minutes later, the apples 10 minutes after that. It usually takes 30-40 mins in total.

roasted veg

Meanwhile place the lentils and bay leaf in a saucepan with the stock or water and bring to the boil. Partially covered with a lid, and simmer for 30 minutes, or until the lentils are just tender. Drain away any excess liquid and discard the bay leaf. Season the lentils with a little salt and pepper, before putting to one side.

To make the dressing, just add the dressing ingredients into a jar with a screw-top lid; cap and shake vigorously to emulsify. Pour some dressing into the lentils when they’re still warm, stirring in a small handful of finely chopped parsley as you do.

To serve, combine the dressed lentils with the roasted vegetables and apple. Divide between two plates, top with broken pieces of soft goats cheese. then drizzle with a little more of the dressing.

#CookBlogShare

How to make Gluten-Free Pumpkin Cupcakes

GF Pumpkin cup cakesThe pumpkins and squashes we have in the UK almost always end up in delicious savoury dishes, like those mentioned in my Favourite Five recipes, but in the USA and Canada they also have a tradition of using pumpkin in sweets and cakes. Famously this is in the form of pumpkin pie, which interestingly actually originates on this side of the Atlantic, with pumpkin pie recipes being found first in English cookbooks’such as Hannah Woolley’s The Gentlewoman’s Companion (1675).  Given our transatlantic cousins’ love of the sweet use of the pumpkin, I thought it was about time I embraced it too. Cupcakes are always a big hit in our family; so, with pumpkins ripened on the allotment, and children (and adults) keen on an after-school snack, I made these Gluten-Free Pumpkin Cupcakes.

You will need (makes 24)
Cakes
300g self-raising gluten-free flour
200g light brown sugar
100g caster sugar
2tsp mixed spice
2tsp bicarbonate of soda
150g sultanas
A pinch of salt
4 beaten eggs
180g unsalted butter, melted
zest 1/2 an orange
1 tbsp orange juice
300g pumpkin purée. (I roasted the pumpkin in two halves, then puréed the flesh, and used the leftover purée for soup)

Icing
100g icing sugar
1 tbsp orange juice
splash of food colouring

Heat your oven to 160°C and prepare the muffin/cupcake tin with paper cupcake wrappers. Mix all the dry ingredients in a bowl and add puréed pumpkin.  Beat the eggs and combine with the melted butter, orange zest and juice. Stir the dry ingredients into the dry mix, ensuring that it is thoroughly mixed.  Pour the batter into the muffin tin, leaving a little space for the mixture to rise in the oven. Bake in the oven for 12-15 minutes until golden and brown, place on a rack, and allow to cool. To make the icing, combine the orange juice and icing sugar to get the desired consistency, then carefully add the colouring, before mixing. Spoon the icing into a piping bag and pipe the cobweb design.

Gluten-free Lemon Ricotta Cake

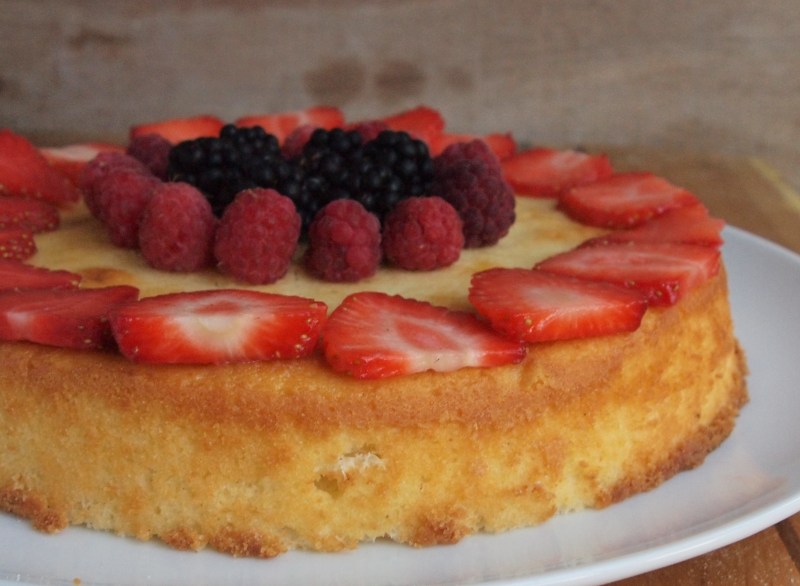
The other day, I was given a load of ricotta which was going to be thrown out. Its use by date was about to pass and therefore was unable to be sold, but essentially it was fine. Given this ricotta mountain, I set myself the task of turning it into delicious food. Ricotta is an Italian whey cheese made from the whey left over from the production of other cheeses like mozzarella, hence its name (ricotta literally means “cooked”). It is a versatile cheese, being used in both sweet and savoury dishes, like the traditional Italian Easter pie, Torta Pasqualina. Given the family’s need for a cake this week, and one which could be used as an impromptu pudding too, I decided to start off by making a ricotta cake; not quite a Sicilian Cassata, but a cake of ricotta, eggs, sugar and a little flour.lemon ricotta cake

You will need
150g softened butter
150g granulated sugar
Zest of 2 large lemons
1/2 tsp. vanilla paste
3 large eggs, separated
250g ricotta cheese
65g gluten-free plain flour, plus a little for dusting
2 tsp. gluten-free baking powder
Dash of Salt
To Serve:
Fresh strawberries, raspberries, blackberries (any berries available and in season)

Preheat oven to 170°C and lightly grease and flour a 20cm spring-form pan.  Beat the butter and sugar, or use the food processer, until light and fluffy. Add the lemon zest, vanilla extract, egg yolks and ricotta cheese and beat until smooth. Mix together the flour, baking powder and salt, before beating into the butter mixture until combined. In a separate bowl, whisk the egg whites until stiff, then gently fold the egg whites into the batter. Pour the batter into the tin, then bake for about 45 minutes, or until a cake tester stuck into the center comes out clean. Allow the cake to cool, then top with your selection of seasonal berries.

How to Make Lavender Shortbreads

An English summer afternoon is not a proper summer afternoon without afternoon tea, and afternoon tea is not afternoon tea without shortbread. The sweet biscuit works really well with the addition of a few lavender flowers. The floral notes of the lavender give the classic shortbread a scented twist. Based on the wonderful Mary Berry’s recipe in her timeless Fast Cakes, this is a real teatime treat. lavender

You will need

200g gluten-free plain flour
100g cornflour
200g butter
100g caster sugar
2 tsp. lavender flowers

Heat the oven to 160°C and grease a 20cm round, loose bottom, tin. Cream the butter and sugar, until light and fluffy. Sift the flour and cornflour together and combine with the lavender and the butter and sugar mix.. Knead together and press into the tin, before chilling for half an hour. Place in the preheated oven for 40 minutes, or until a pale golden colour. The gluten-free flour results in a paler finish to normal shortbread, so don’t expect a well browned shortbread. Remove from the oven and cut into wedges, leaving the shortbread to cool in the tin. Lift out onto a cooling rack and sprinkle with a little sugar.

Raspberry Friands

We always end up having egg whites left over from cooking. Apart from meringue, which can be used to make a favourite of our family, Eton Mess; I struggle to find uses for these leftover whites. I recently discovered friands; a version of the classic French financier which is popular in the antipodes. These little cakes use almond flour and lightly whipped egg whites to form a delicious sweet morsel, which compliments the acidity of raspberries brilliantly.

raspberry friands and coffee

You will need (makes 24 small friands)
4 egg whites
120ml milk
A dash of Rosewater
60g margarine melted
125g ground almonds
250g cups gluten-free icing sugar
70g gluten-free plain flour
A dash of sunflower oil
150g frozen raspberries
50g flaked almonds

Preheat oven to 180°C.  Beat egg whites for 1 minute or so until they are frothy, but not firm. Add the milk to the melted margarine and dash of Rosewater, before combining with egg whites. Fold ground almonds into mix using a wooden spoon, before sifting the icing sugar and flour into the bowl, then gently folding it all together. The less the mixture is moved around at this point, the lighter the friands. Grease a 12-cup mini muffin (or friand )tin with a little oil, then spoon equal amounts into 12 holes. Press 2 raspberries in each friend, so they are covered with mixture and then top with a few flaked almonds.

Bake for 20 minutes or until firm to touch on the centre. Leave in pan for a few minutes before turning friands out onto a wire rack to cool.

20140625-204505-74705831.jpg

friands and coffee


Favourite Five Broad Bean Recipes

favorite fiveI’ve mentioned earlier this month that the first broad beans of the season are a real delight for me. I like the fact that you can plant a few beans in October or November and they emerge in the last of the autumnal sun, brush off whatever the winter throws at them, then rapidly grow as the days warm in spring. One single bean brings one plant, but a whole basket of harvested pods and countless beans. They are one of the easiest of crops to grow, only being slightly blighted by black fly and bird attack. I’ve found that overwintering the beans seems to cut down on the black fly attacks, but opens up the possibility of birds like pigeons feasting on the new shoots. So I often use a net to cover the plants in their infancy, and also pinch out the tops of the plants when the beans are formed; which I’m told reduces the chance of the black fly descending. As an ingredient the beans are perhaps at their best when small and sweet, although the larger beans work well when made into purees and we had amazing large dried and fried beans in Peru; a kind of Latin salted peanut.

Broad bean

Broad beans are a great ingredient and often make their way onto our plates. Here are my Favourite Five Broad Bean recipes.

Broad Bean Hummus – Cook 400g of shelled beans in boiling, lightly salted water till tender  about 8-10 minutes or so). Drain, cool and pop them out of their slightly grey skin. Whizz with a small sprig of mint in a food processor before pouring in a little lemon juice, and some olive oil as the processor blitzes. Continue to mix until smooth.

Broad Bean, Pea and Mint Tagliatelle  – This is perhaps our favourite spring/summer pasta dish. Start by blanching the beans   and peas (100g of each shelled). If the beans are young you don’t need to peel off the outer skin, but if older its worth the time. Take half of the beans and peas and whizz in food processor until semi-smooth. Finely chop a garlic clove and soften in some olive oil, add the whizzed pea/bean mix and cook for a minute or so. Add 200ml of double cream and the other half of the beans and peas. Stir in a handful of chopped mint and 75g grated parmesan. Add your choice of cooked pasta to the sauce, serve with a little extra parmesan sprinkled on top.

broad bean pea and mint pasta

Broad Bean Falafels – Place 500g podded broad beans in a food processor and whizz; add 1tsp. baking powder, small red onion, 1 clove garlic, handful of chopped coriander, parsley and mint, and 1 tsp. cumin seeds. Blend until smooth, adding a little lemon juice to help it break down. Add a little olive oil and then form into balls. Chill for a few minutes and then fry in oil until crisp, serve in a pitta with hummus and minted yoghurt.

Broad Bean and Chorizo Tapas – Cook the podded broad beans in salted water for 8-10 minutes, drain and peel off greyish skin. Meanwhile, slice a chorizo and fry in a little oil. Add the beans to the chorizo and spicy oil, toss for a few minutes, then add chopped flat leaf parsley.

Broad Bean, Pea and Feta Orzo Salad – Orzo, a delicate grain-shaped pasta, is quick to cook. Whilst it cooks, sauté 2 shallots, lemon zest, and some cooked peas and beans in a bit of butter. Combine the bean and pea mix with the pasta, some chopped feta, and a finely chopped mint. A great summer salad or side dish.

What ways do you use broad beans in your cooking?

I’m dead chuffed to be shortlisted in the FOOD category for the BIBS (Brilliance in Blogging Award). If you think I deserve to be in the final then please vote for me by clicking on the picture below. Thank you for all your support!

BiB Food 2014


Favourite Five Gluten Free

favorite five

Those of you who follow @spadeforkspoon on Twitter may have noticed an increase in tweets about gluten free cooking over the last few weeks. This is because my son has recently been diagnosed as coeliac and therefore needs to follow a gluten free diet. Adapting meals to fit in with his new dietary requirements has been a bit of a challenge, but we’re getting there. Little Button Diaries asked me to create a Gluten-free Favourite Five for their blog. So, take a look and see what made the final five.

What would be in your favourite five gluten-free dishes?

Torta Pasqualina – A Pie for Easter

Swiss chard is one of the heroes of my plot, and I’ve blogged about my love of it before. Its vibrancy always makes a visit to the plot a joy, but recently its been joined by many green shoots and leaves emerging all over the plot. Spring is such a great season and the prospect of new life and a season of growing ahead is an uplifting one. Although much is growing at the allotment, there is not a vast amount able to be harvested; and with Easter coming up I was looking for a dish which could combine some allotment ingredients and celebrate Easter at the same time. Cue the arrival of the Guardian the other day and Yotam Ottolenghi’s recipe for a Torta Pasqualina. It seems the Italians also have a need for an Easter dish which uses seasonal vegetables. The combination of chard and ricotta is always a good one, and having discovered Genius Gluten Free Puff Pastry recently its a dish I can make for the whole family. Here’s my recipe, loosely based on Ottolenghi’s.

Torta pasqualina

You will need (makes enough for 8)

2 tbsp olive oil
1 small onion, peeled and finely chopped
1kg Swiss chard (we have the Rainbow variety which adds great colour to the dish), stalks stripped and finely chopped, leaves shredded
2 sticks celery, finely sliced
Handful of parsley leaves, finely chopped
Small handful of new fennel tops, finely chopped
½ tsp ground mace
¼ tsp grated nutmeg
250g ricotta
50g parmesan
9 eggs
Salt and black pepper
500g Genius Gluten-free puff pastry
Gluten-free plain flour, for dusting

Start by sweating the onion for a few minutes until it is softened, then add the chopped chard stalks and celery. Continue to cook for a few minutes, before adding the leaves and allowing them to wilt. Take the pan off the heat, cool, then place the mix into a tea towel and squeeze out any liquid. The dryer the mix, the better it will hold its form later. Add the cheese, herbs, spices and 3 eggs to the chard mix and mix thoroughly (seasoning with a little salt and pepper as needed).making a torte pasqualina

Roll out the 2/3 of the pastry and use it to line a 20cm loose bottom cake tin. Place the chard mixture into the pastry case and make 5 indentations, breaking an egg into each, before rolling out the remaining pastry and making a lid for the pie. Trim the edges and then crimp them to provide a secure seal. Brush with  beaten egg and prick a few holes in the pastry, before placing in a preheated oven (180°C) for 45 minutes, until golden on top. Leave to cool and serve.

torta pasqualina