The Macro Allotment

Season of mists and mellow fruitfulness
Close bosom-friend of the maturing sun
Conspiring with him how to load and bless
With fruit the vines that round the thatch-eves run;
To bend with apples the moss’d cottage-trees,
And fill all fruit with ripeness to the core;
To swell the gourd, and plump the hazel shells
With a sweet kernel; to set budding more,
And still more, later flowers for the bees,
Until they think warm days will never cease,
For Summer has o’er-brimm’d their clammy cells…
First verse of To Autumn, by John Keats

It’s Been a While

My trips to the allotment have really gone by the way side recently. Through a combination of spending more time working on the Stoneham Bakehouse, trying to spend more time with the family, and the rubbish weather we’ve had this summer, the allotment has taken a back seat.

The allotment, for the last couple of years particularly, has been really important to me. Really important for my recovery from depression and anxiety, really important for my family to get some space, and really important in providing us with a variety of fresh vegetables and fruit.  

 As Autumn shows its true colours, with beautiful ruddy leaves appearing on the trees, I’m inspired to get back to the allotment with some regularity. Being outside is always beneficial to my wellbeing, and I sometimes need to be reminded of how it can help me. I think with weather set to be fine for the weekend, a trip to the plot is needed.

A Salad for the Allotment

Since the Bakehouse has taken more of my time, I’ve spent less time at the allotment than I had been (and probably less than I should). With sightly less baking and teaching to do, I’ve managed to grab some moments to hit the plot and enjoy an open air lunch. There’s nothing better than a picnic, and having you’re own bit of ‘countryside’ to sit in and relax with a meal is brilliant. Packed lunches; whether taken to the allotment, in a picnic basket, or eaten at work; needn’t be boring. They shouldn’t be an excuse for an unhealthy mishmash of packets either. It takes very little effort to produce something which is both healthy and delicious.

I recently got contacted by the team from Simply Health, who were looking for some healthy packed lunch ideas. I like to use allotment produce, so a salad using the newest of beetroot and fresh herbs seemed a good idea. I love the earthy sweetness of the anti-oxidant rich beets, and teamed with the saltiness of a cheese like feta, its perfect for a summer packed lunch. Lentils are brilliant for salads, adding bite and a good source of protein and carbohydrates.BEETROOT

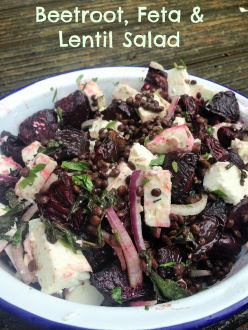
Beetroot, Feta and Lentil Salad

You will need (serves 2)

A bunch of beetroot
200g green lentils (Puy lentils are the best as they retain their bite the best)
Bay leaf
200g feta or similar cheese
4 tbsp olive oil
1 tbsp cider vinegar
1 tsp Dijon mustard
pinch of salt and a few twists of black pepper


Start by trimming the beetroot of  the leaves (which if young can make a great salad), then cut into bite size chunks. Toss in a little olive oil and roast in a hot oven for 3o-40mins, until the beets are soft and slightly charred. Remove from the roasting tray and retain the beetrooty oil to make the dressing. Whilst the beetroot roasts, place the lentils in cold water with a bay leaf and bring to the boil; you can now get pre cooked lentils in packs, which saves time on this, but I like to always have a supply of lentils cooked and in the fridge, so cooking from scratch allows me to make more than I need. Lentils need about 25mins to cook, but check after 20 as its important they retain a bit of bite. Once ready, drain, and make the dressing by combining the retained oil, mustard, vinegar, and seasoning. With the lentils still warm, pour the dressing into them and stir, allowing the lentils to absorb some of the dressing’s flavour.

To prepare the salad, combine the lentils and beetroot, along with the finely chopped mint. Crumble the feta into this mix, before gently stirring the ingredients to ensure that every mouthful includes all the flavours. If you wanted, you could add salad leaves at this point (something peppery like watercress would go well), but I like the earthy nature of this salad as it is. Pop the completed salad in a sealable container and take it on your travels, to work, or (like me) to the allotment. Just remember a spoon or fork to eat it with!


Gooseberry & Elderflower Curd

gooseberry

The gooseberries on the plot are looking fabulous at the allotment. We’ve got one of the slightly more unusual red varieties of gooseberry, and their dark red jewels are protected by a barrier of thorns. I like the fact that these berries are surrounded by vicious spikes, it means the fruits don’t tend to get eaten by the usual marauding flocks of animals and birds, and there is an increased sense of satisfaction in picking them without getting too spiked!

Gooseberries are a great fruit to have on the plot. They pretty much look after themselves, and you can get two crops from them; one when you thin the small green (and rather sharp) fruits to make space for the main crop, the other as the red bulging fruits ripen. The flavour of these later fruits is distinctly floral, with a pleasing balance of sweet and sharp. Perfect to add a bit of zing to an afternoon crumpet. An old fashioned thing perhaps, curd is a brilliant addition to your breakfast table. Simultaneously tart and sweet, its velvety texture gives a touch of luxury to the morning toast.

The classic curd is lemon, but as my allotment is not on the mediterranean coast, the search for a tart and flavoursome fruit has taken me to gooseberies. The quinteseentially English early summer fruit.

You will need 

500g gooseberries
3 sprigs elderflowers (or a dash of elderflower cordial)
100ml lemon juice
125 unsalted butter
450g granulated sugar
200ml strained beaten egg (4 or 5 eggs)

Cook the gooseberries, lemon juice and elderflower for a while until the fruit collapses and the juices flow. Allow the puree to cool a bit, then rub through a sieve to form a puree. Mix the puree, butter and sugar together in a basin over a pan of boiling water. Stir until the butter has melted and you have a smooth texture. Take off the heat and allow to cool a little (about acceptable finger dipping cool). Pour the strained beaten eggs into the berry mixture, then whisk over the boiling water until thick and creamy. Pour into sterilised jars and allow to cool fully before spreading on hot toast, using in a cake, or just dipping in a spoon for a quick taste!

June at Plot 4

So, summer has started and its rained all day for the first two days of the month! Still, it promises to be a good, and busy, month at the allotment.

With the transition from spring to summer, there is increasingly more to harvest from the plot. The salad leaves have enjoyed the gentle rise in temperatures and surfeit of water, producing a great crop of cut and come again leaves. We’ve also seen the Swiss chard in its last flourish, producing some beautiful glossy leaves, which have made their way into curries, tarts and pasta dishes. As the days get longer, with increasing amounts of sunlight, the strawberries have been getting close to ripening, and we should be enjoying their juicy sweetness very soon.

This time of year is brilliant for sowing, as pretty much anything will germinate rapidly, sprouting into life and onto its journey to harvest. I’ve been sowing more French beans, both climbing and dwarf varieties. Starting them off in plugs in the greenhouse to avoid the mice and rats getting the seeds before they germinate. I’ll also sow some cime de rapa; it’s very short period of growth allows us to fill gaps in the ground before planting out other crops later in the year. A succession of salad leaves, and even a few more peas will no doubt also be sown during the month.

With all the seedlings, and plants growing, there are many jobs on the plot at the moment; not least the unending battle to keep the growth of weeds under control. I’ve installed a new water butt at the top of the plot, and I’m looking to link it with the old one to allow me to collect the maximum amount of rainwater. The growing temperatures we hope for as June develops will bring an increased need for watering, so we’ll be using the longer evenings to nip to the plot for a quick water, weed and crop. Here’s to some warm evenings at the allotment; it’s one of my favourite times to visit.

Garden share collective badge
This post is contributing to The Garden Share Collective; an international group of bloggers who share their vegetable patches, container gardens and the herbs they grow on their window sills.

Friends, Neighbours and Allotmenteers

One of the brilliant things about the allotment is the way it brings people together. Unlike in some places (and probably some in our city) people of all backgrounds are drawn to each other to talk, to share and to help. There is a real sense of community when you venture onto the allotment site.

When I walk through that gate, Peter or Mo will usually be at the site office an give me a wave, or offer a weather forecast. As I venture down the track to our plot, I’ll get a nod or a hello from one or other of the plot holders. Some people I just know to say hello to; but others, like my direct allotment neighbours are friends. When I was at my lowest and the allotment was the only place other than the house I could feel safe, talking to them about the plot and life was of real help. They know more about me than some of my real neighbours. Non-judgemental listening has been their gift to me; listening as I explained how I felt. In returrn I would listen to their problems, would offer my thoughts on this and that. All this quite literally over the garden fence.

The community spirit goes beyond words though. When my strimmer didn’t work recently a guy arranged for someone else to strim the path and areas on the plot perimeter. Just before leaving the plot yesterday my fabulous neighbour, Jean, brought me some rhubarb; “I know the kids don’t like it love, but you can treat yourself”. She knows me too well. I don’t treat myself enough, and as the kids really don’t like rhubarb I don’t bother with it too much. But I really like it. So this morning I had roasted rhubarb on my porridge, and loved it. Thank you Jean.

How to make Allotment Focaccia

As many of you may have noticed, I’ve been a little less prevalent in posting recently. The allotment has had to take a back seat as plans for the community supported bakery, and baking itself, have had to take precedent. Fortunately, the weather and season has offered me the excuse to put the allotment into hibernation with only a little guilt that I should be tending, clearing or digging. Plot 4 has been a critical part of my ongoing recovery and a place of safety from the Black Dog of depression, but as I move on, baking has joined it in providing me with the chance to be mindful. This recipe is therfore an important one to me; combining, as it does, two therapeutic activities and experiences in one food.

The great thing about having an allotment is having a range of herbs and crops that cna be used in all your cooking. My little garden at home, with a small herb planter, can’t sustain the constant use of a family, but the plot’s herb garden can. So, the herbs for this bread come from the plot; picked on a beautiful spring morning, their fragrance is brought to life topping this traditional hearth bread.

You will need
500g strong white flour
7g salt (plus more flaked sea salt to sprinkle on top of the finished bread)
7g dried yeast
60ml olive oil (plus more to  work the dough and drizzle on top of the finished bread)
310ml warm water
Your choice of herbs to top the bread with (I used marjoram and some chopped rosemary)

Start by mixing all the ingredients (minus the herbs) together to form a rough dough. Continue to knead the dough until it becomes smooth; using a little olive oil on the worksurface can help to stop the dough sticking, and help you to achieve the silken finish you’re looking for. The kneading will take about 10 minutes, after which you should form the dough into a ball, place in an oiled bowl, cover and leave to ferment for a couple of hours.

After 120 minutes, take the dough out of the bowl, lay it flat, and fold it over on itself. Place back in the bowl for a further half an hour. Meanwhile oil a tray a 40×30 tray, then take the doughwith oiled hands and stretch it to fill the tray. Scatter your chosen herbs over the top and massage into the dough, making dimples usiny your fingers. Pour a little more oil over the dough and leave to prove for an hour or so. Bake in a hot oven (230°C) for 20-25 minutes until golden. Allow to cool a bit before taking off the tray and cutting into portions.


I topped this focaccia with simple herbs; but the beauty of this bread is that onions, potatoes, courgettes, even peppers, would work equally well. It really is a bread for the allotment.