How to make Gluten-Free Pumpkin Cupcakes

GF Pumpkin cup cakesThe pumpkins and squashes we have in the UK almost always end up in delicious savoury dishes, like those mentioned in my Favourite Five recipes, but in the USA and Canada they also have a tradition of using pumpkin in sweets and cakes. Famously this is in the form of pumpkin pie, which interestingly actually originates on this side of the Atlantic, with pumpkin pie recipes being found first in English cookbooks’such as Hannah Woolley’s The Gentlewoman’s Companion (1675).  Given our transatlantic cousins’ love of the sweet use of the pumpkin, I thought it was about time I embraced it too. Cupcakes are always a big hit in our family; so, with pumpkins ripened on the allotment, and children (and adults) keen on an after-school snack, I made these Gluten-Free Pumpkin Cupcakes.

You will need (makes 24)
Cakes
300g self-raising gluten-free flour
200g light brown sugar
100g caster sugar
2tsp mixed spice
2tsp bicarbonate of soda
150g sultanas
A pinch of salt
4 beaten eggs
180g unsalted butter, melted
zest 1/2 an orange
1 tbsp orange juice
300g pumpkin purée. (I roasted the pumpkin in two halves, then puréed the flesh, and used the leftover purée for soup)

Icing
100g icing sugar
1 tbsp orange juice
splash of food colouring

Heat your oven to 160°C and prepare the muffin/cupcake tin with paper cupcake wrappers. Mix all the dry ingredients in a bowl and add puréed pumpkin.  Beat the eggs and combine with the melted butter, orange zest and juice. Stir the dry ingredients into the dry mix, ensuring that it is thoroughly mixed.  Pour the batter into the muffin tin, leaving a little space for the mixture to rise in the oven. Bake in the oven for 12-15 minutes until golden and brown, place on a rack, and allow to cool. To make the icing, combine the orange juice and icing sugar to get the desired consistency, then carefully add the colouring, before mixing. Spoon the icing into a piping bag and pipe the cobweb design.

Advertisement

Raspberry and Rose Cake

raspberry rosewater cake
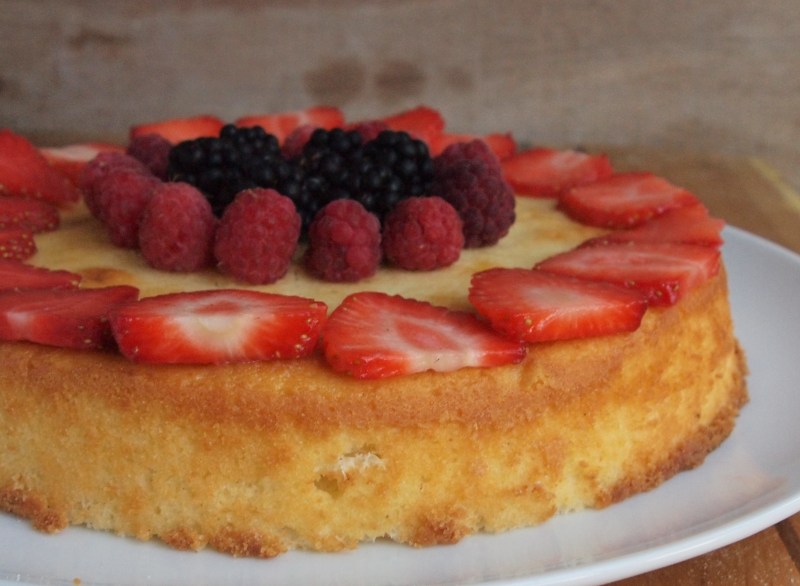
My daughter has really got into the idea of baking. She sees both my wife and myself cooking and is pretty into the culinary exploits of the contestants on the Bake Off. Recently she decided she should have a go making a cake by herself (well the placing in the oven bit aside). This recipe is adapted from one in the cookbook of Bill’s Restaurant; for those of you unaware of this small chain of restaurants which started in Lewes, they produce good seasonal food with an emphasis on fresh fruit and veg. The resulting cake is a bit of a show stopper, perfect for a summer tea party.
You will need
Cake
225g caster sugar
225g unsalted butter, softened
4!medium eggs, beaten
1 knife tip of vanilla paste
1.5 tsp baking powder
225g self-raising flour, sifted
Rose cream filling
150ml double cream
1/2 tsp rosewater
4 tbsp raspberry jam
150g fresh raspberries
Rose glacé icing
175g icing sugar
2 tbsp warm water
1 tsp rose water

This makes a two-tier cake, but Matilda made a three tier version by using half as much ingredients again.

Preheat oven to 180°C, lightly butter two cake tins 20cm in diameter and line with baking parchment.
In a large mixing bowl, beat the sugar and butter together till they are pale and fluffy. Add the vanilla paste before slowly adding the beaten egg a little at a time. The mixture may start to curdle, but if you add a teaspoon of flour, it should bring it back together. Mix in the baking powder and half the flour, then fold in the rest. Share out the batter between the cake tins. Smooth the tops, then bake for 20-25 minutes until they are golden, risen and have shrunk away slightly from the sides of the tin. Leave the cakes in their tins for 10 minutes before turning out on to a wire cooling rack.

Whilst you wait, whisk the double cream until it stands in soft peaks, adding the small amount of rosewater as you go. Fold in the raspberry jam, and when the cakes are completely cool, turn one of them flat base uppermost, spread with the cream mixture and scatter with slightly crushed raspberries. Top with the second cake. If you’ve made three cakes, spread more cream and raspberries over the second layer and top with the third.

For the pink glacé icing, mix together the icing sugar, water and rosewater, and stir in the juice from a few crushed raspberries. Drizzle the icing across the cake and top with roses, rose petals and the remaining raspberries.

From the Bill’s Produce cookbook, Cook, Eat Smile.
28198-cookblogshare

Gluten-free Lemon Ricotta Cake

The other day, I was given a load of ricotta which was going to be thrown out. Its use by date was about to pass and therefore was unable to be sold, but essentially it was fine. Given this ricotta mountain, I set myself the task of turning it into delicious food. Ricotta is an Italian whey cheese made from the whey left over from the production of other cheeses like mozzarella, hence its name (ricotta literally means “cooked”). It is a versatile cheese, being used in both sweet and savoury dishes, like the traditional Italian Easter pie, Torta Pasqualina. Given the family’s need for a cake this week, and one which could be used as an impromptu pudding too, I decided to start off by making a ricotta cake; not quite a Sicilian Cassata, but a cake of ricotta, eggs, sugar and a little flour.lemon ricotta cake

You will need
150g softened butter
150g granulated sugar
Zest of 2 large lemons
1/2 tsp. vanilla paste
3 large eggs, separated
250g ricotta cheese
65g gluten-free plain flour, plus a little for dusting
2 tsp. gluten-free baking powder
Dash of Salt
To Serve:
Fresh strawberries, raspberries, blackberries (any berries available and in season)

Preheat oven to 170°C and lightly grease and flour a 20cm spring-form pan.  Beat the butter and sugar, or use the food processer, until light and fluffy. Add the lemon zest, vanilla extract, egg yolks and ricotta cheese and beat until smooth. Mix together the flour, baking powder and salt, before beating into the butter mixture until combined. In a separate bowl, whisk the egg whites until stiff, then gently fold the egg whites into the batter. Pour the batter into the tin, then bake for about 45 minutes, or until a cake tester stuck into the center comes out clean. Allow the cake to cool, then top with your selection of seasonal berries.

How to Make Lavender Shortbreads

An English summer afternoon is not a proper summer afternoon without afternoon tea, and afternoon tea is not afternoon tea without shortbread. The sweet biscuit works really well with the addition of a few lavender flowers. The floral notes of the lavender give the classic shortbread a scented twist. Based on the wonderful Mary Berry’s recipe in her timeless Fast Cakes, this is a real teatime treat. lavender

You will need

200g gluten-free plain flour
100g cornflour
200g butter
100g caster sugar
2 tsp. lavender flowers

Heat the oven to 160°C and grease a 20cm round, loose bottom, tin. Cream the butter and sugar, until light and fluffy. Sift the flour and cornflour together and combine with the lavender and the butter and sugar mix.. Knead together and press into the tin, before chilling for half an hour. Place in the preheated oven for 40 minutes, or until a pale golden colour. The gluten-free flour results in a paler finish to normal shortbread, so don’t expect a well browned shortbread. Remove from the oven and cut into wedges, leaving the shortbread to cool in the tin. Lift out onto a cooling rack and sprinkle with a little sugar.

Raspberry Friands

We always end up having egg whites left over from cooking. Apart from meringue, which can be used to make a favourite of our family, Eton Mess; I struggle to find uses for these leftover whites. I recently discovered friands; a version of the classic French financier which is popular in the antipodes. These little cakes use almond flour and lightly whipped egg whites to form a delicious sweet morsel, which compliments the acidity of raspberries brilliantly.

raspberry friands and coffee

You will need (makes 24 small friands)
4 egg whites
120ml milk
A dash of Rosewater
60g margarine melted
125g ground almonds
250g cups gluten-free icing sugar
70g gluten-free plain flour
A dash of sunflower oil
150g frozen raspberries
50g flaked almonds

Preheat oven to 180°C.  Beat egg whites for 1 minute or so until they are frothy, but not firm. Add the milk to the melted margarine and dash of Rosewater, before combining with egg whites. Fold ground almonds into mix using a wooden spoon, before sifting the icing sugar and flour into the bowl, then gently folding it all together. The less the mixture is moved around at this point, the lighter the friands. Grease a 12-cup mini muffin (or friand )tin with a little oil, then spoon equal amounts into 12 holes. Press 2 raspberries in each friend, so they are covered with mixture and then top with a few flaked almonds.

Bake for 20 minutes or until firm to touch on the centre. Leave in pan for a few minutes before turning friands out onto a wire rack to cool.

20140625-204505-74705831.jpg

friands and coffee


Favourite Five Gluten Free

favorite five

Those of you who follow @spadeforkspoon on Twitter may have noticed an increase in tweets about gluten free cooking over the last few weeks. This is because my son has recently been diagnosed as coeliac and therefore needs to follow a gluten free diet. Adapting meals to fit in with his new dietary requirements has been a bit of a challenge, but we’re getting there. Little Button Diaries asked me to create a Gluten-free Favourite Five for their blog. So, take a look and see what made the final five.

What would be in your favourite five gluten-free dishes?

Favourite Five Mustard Recipes

Spadeforkspoon Favourite FiveMustard is a great ingredient offering piquancy to many a dish. It is a member of the Brassica family of plants which has tiny round edible seeds as well as tasty leaves. Its English name, mustard, comes from a contraction of the Latin mustum ardens meaning burning must. This refers to the spicy heat of the crushed mustard seeds and the French practice of mixing the ground seeds with must, the young, unfermented juice of wine grapes. Although mustard was considered a medicinal plant initially, it has become a staple of many food cultures. Prepared mustard dates back thousands of years to the early Romans, who used to grind mustard seeds and combine them with wine to form a paste not much different from the prepared mustards we have today. It’s a store cupboard essential and here are my favourite five uses of mustard.

Mustard Soup  – This is a delicious soup which I first tasted in Amsterdam. It combines the piquancy and texture of wholegrain mustard with a silky smooth creme fraiche based liquor. Simple to make and a great winter warmer.

Cheese and Mustard Scones – Cheese scones are one of life’s little pleasures; especially so when served warm and the butter melted slightly on top. The addition of a little grain mustard really brings out the cheesiness, and gives them a slightly more sophisticated flavour. My son has recently been diagnosed as coeliac, so this recipe is for gluten free scones, but the addition of mustard to your usual cheese scone recipe would work. Combine 275g gf plain flour, 50g ground almonds, 3tsp baking powder, 2 tsp xanthum gum and 1 tsp salt in bowl and rub 100g butter into the dry mix to make breadcrumbs. Add 100g of whatever cheese you have around (generally cheddar and Parmesan in our case). Combine 2 eggs with a tbsp wholegrain mustard and 125ml yoghurt. Pour this into breadcrumb mix and bring the ingredients together with a fork. Turn the dough onto a floured surface and flatten to 3cm thick, before cutting out into scone shapes. Transfer onto a baking sheet, brush the tops with a little milk and grate a little more cheese on top. Cook for 10 minutes at 220 °C. Leave to cool slightly before eating.

Piccalilli – This has been my food revelation of the year. For years I’ve seen the yellow pots of Piccalilli on sale and thought they looked over processed and not too tempting. Then early in 2013 I had a dish in Bridport which had a delicious Piccalilli accompanying pig’s head croquettes. It just worked so well. So, when I had a glut of veg at the plot, I made some of my own and it’s been in constant use ever since. As well as vegetables from the plot, it uses a combination of English mustard powder and mustard seeds to make a simple punchy preserve.

Mustard mash – A simple use of wholegrain mustard to give the humble mash a bit of a twist. Boil, drain and mash your potatoes, before adding a knob of butter and a spoonful of wholegrain mustard. It goes brilliantly with sausages, but would work with other meats too.

Mustard and Honey Dressing – This is our ‘go-to’ dressing. Throughout most of the year we have a jar of this in the fridge. It’s speedy to make, lasts a few days, and really compliments a range of salad leaves. To make, just add the following to a jar with a screw-top lid: 3tbsp olive oil, 1tbsp lemon juice, 1 tsp Dijon mustard, 1/2 clove of garlic crushed, 1/2 tbsp honey, pinch of salt and sugar and a few twists of black pepper. Cap and shake vigorously to emulsify. It can be easily upsized for the summer months, when there isn’t a day that goes by without salad featuring on our plates.

mustard dressing
What ways do you use mustard in your cooking?


Apple Flapjack for an Allotment Bonfire Night

Our allotment site is a great slice of society. The plot is surrounded by others tended by young working families, elderly couples, the unemployed, hard worked public sector workers; people of all races and creeds. It is a great and supportive community, and last night we shared on a bonfire celebration. Allotment holders from across the site got together and sat around a raging fire enjoying the local firework display, cider made from our own apples, and pizzas cooked on the wood burning pizza oven.

Wanting to contribute something to the proceedings, I decided to create a bonfire flapjack. As we still have quite a few windfall apples I chose to flavour it with them, and use some of the pumpkin seeds and sunflower seeds I’d collected last months. I often make River Cottage Honey and Peanut Butter Booster Bars, which used to be a big hit with my former colleagues. So I used the recipe as a basis for my Bonfire Apple Flapjack. To give it a more bonfire dark stickiness, I used dark muscovado sugar, and added a combination of grated and diced apple instead of huge dried fruits.

20131104-082434.jpg
What you will need
125g unsalted butter
125g dark brown muscovado sugar
100g no-sugar-added crunchy peanut butter
75g honey, plus a little more to finish
Grated cooking apple
Finely grated zest of 1 lemon
250g porridge oats (or the equivalent weight in oats and crushed leftover cereal)
A large apple peeled, cored and diced
100g mixed seeds (I used pumpkin and sunflower)

20131102-163320.jpg
Start by greasing and lining a baking tin, about 20cm square. Put the butter, sugar, peanut butter, honey, grated lemon zest and cooking apple in a deep saucepan over a low heat. Heat until the mixture is melted, stirring occasionally. Combine the oats, diced apple and most of the seeds into the melted butter mixture and stir until it’s thoroughly combined. Spread the mixture out evenly in the baking tin, smoothing the top as you go. Finally scatter the rest of the seeds over the surface and trickle with a little more honey. At this point I tend to use the palm of my hand to press down the mix slightly.
Pop the tin in an oven preheated to 160°C/Gas Mark 3 and bake for about 30 minutes, until the flapjack is golden all over and slightly crispy on the edges. It’s really important that it is left to cool completely before turning out and cutting into squares with a sharp knife. As Hugh Fearnley-Whittingstall suggests in his original recipe; this is a tricky task, but the flapjack will cut much better if you can manage to hang on before devouring. The crispy oats contrast well with the soft sweet apples, and the muscovado sugar hints of toffee apples on a cold afternoon. A perfect treat to munch whilst watching fireworks and watching the dancing flames of a bonfire.

20131103-093237.jpg

Hugs and Biscuits

“Can I give you a big hug?” asked my son the other day. “Of course” I replied. A hug is something we all need now and again. I love how children, naturally more uninhibited, will just ask for a hug, or in my son’s case just offer one. The feeling of being embraced is often all that is needed to solve a problem, or to change one’s mood.

Last week, the children and I ended up getting a coffee and biscuit in the great Caffé Bar Italia di Napoli down the road. I’ve never been to Italy, but it strikes me that this cafe is pretty much as the cafés of Naples (the proprietor’s home town) are like. The coffee is good and the range if biscuits and antipasti super. To accompany our drinks we had some small biscuits which were half chocolate and half vanilla. Deliciously crisp and crumbly, yet not overly sweet, they’re called Abracci. The name translates as ‘hug’, and the vanilla and chocolate halves clasp each other as if they are hugging.

Having looked online, I found a number of recipes (including a recipe from the commercial makers Mulina Bianco) and tracked down what seems like a key ingredient; potato starch, which helps the dough to keep its shape when baking, and maintains the ‘hug’. Whether they are served with a coffee or tea, they are a delicious light biscuit and like a hug bring a smile to your face.

Abracci (makes 72 biscuits)

What you will need
Cream dough:
200g flour
50g potato starch
100g of sugar
50g of butter
45g of margarine
3 tablespoons of fresh cream
1 tablespoon of honey
Knife tip of vanilla bean paste
1/2 teaspoon of baking powder
pinch of salt

Cocoa dough: 
200g flour
50g potato starch
120g of sugar
40g of margarine
60g of butter
30g cocoa powder
40g of fresh milk
1 egg
1/2 teaspoon of baking powder
pinch of salt.

You need to prepare the two flavoured doughs, then combine before baking. First mix the margarine, butter and sugar until creamy. When light and fluffy, add the cream, vanilla and the honey and mix thoroughly. Finally fold in the flour, potato starch, salt and the baking powder, mixing until all the ingredients are thoroughly combined in a dough.  For the cocoa dough, repeat the process of creaming the butter, margarine and sugar, before adding the milk and egg. Fold in the remaining dry ingredients to make a dough. Allow the dough to rest in the fridge for 30 minutes.

20131022-210117.jpg
Take the dough from the fridge and roll to form 30cm sausages. Divide each sausage into 3cm pieces and then combine one cocoa and one cream sausage to form the ‘hug’ shape shown in the photo above. Bake at 180 ° C for 10-15 minutes. The biscuits are ready when the cream part has started to turn golden brown.

20131023-105502.jpg

Cheesy Feet

For quite a while now we have made cheese biscuits based on a River Cottage recipe (adapted below). Biscuits are always popular in our house, and in making cheese ones we hope to reduce our sweet intake a little. The idea of adapting the idea to create ‘cheesy feet’ came from a trip to Bradford on Avon – where (in desperate need of a snack) we bought some cheesy feet from the baker at the weekly Farmers’ Market. For months we’ve looked out for a foot cutter to create our own version, finally finding one the other week.

With Halloween coming up, the children and I decided to make some cheesy feet with added gruesomeness – hence the addition of dodgy looking nails in the form of pistachios. You could use flaked almonds, but the green and brown tinge to pistachios seemed to fit the Halloween theme best.

20131024-140636.jpg
What you will need (Makes 20-24)
125g unsalted butter, cubed
125g cheddar, grated
4 tbsp grated parmesan
150g plain flour
½ tsp bicarbonate of soda
A pinch of salt
2 tsp yogurt
A few grinds of black pepper
Pistachio nuts – halved

This is a really easy recipe, as all you need to do is whizz everything in a food processor until it comes together into a ball, then remove the dough and knead for a minute or so. Wrap the dough in clingfilm and pop it in the fridge for half an hour. Preheat the oven to 190C/375F/gas mark 5.

20131024-140922.jpg
Roll out the dough on a lightly floured surface until it’s about 3-4mm thick, then use your foot cutter (or any other shape you want) to cut out the biscuits. Place five of the halved pistachios on each foot to resemble nails, then move the biscuits onto baking sheets lined with baking parchment and bake for 10 minutes, until golden. Cool on a wire rack.