Elderflower Cordial

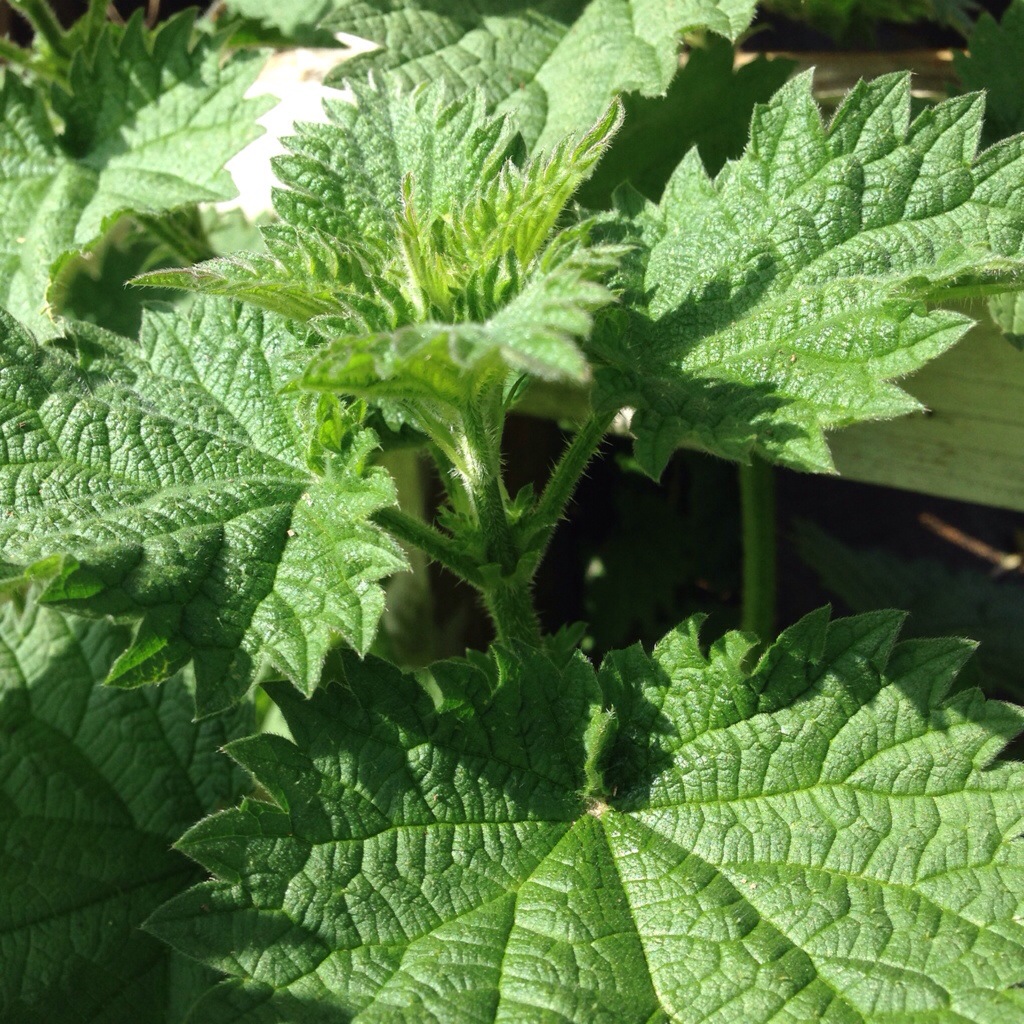
I look forward to the first few Elderflower blooms on the tree at the allotment. For me it really marks the start of the growing season, and in particular the start of the period of cropping from the allotment. At the moment the Queen of the Hedgerow is covering the land with white blooms and its heady scent. Elderflower has historically been known as a medicinal herb; being diaphoretic, anti-inflammatory and anti-catarrhal, and can be prepared as tea, tincture or a cold infusion. In culinary terms it is used in fritters, and perhaps most often made into a cordial. For me an ice cold drink of Elderflower cordial with a sprig of mint is the perfect summer afternoon refresher, and best of all its cheap and easy to make your own.

20140514-180724.jpg

 You will need
About 25 elderflower heads – Elderflowers need to be picked in the first half of the day and in sunshine in order to get the best cordial.
Finely grated zest of 3 lemons and 1 orange, plus their juice (about 150ml in total)
1kg sugar
1 heaped tsp citric acid (optional)

Check out the elderflower heads carefully and remove any bugs and bits. Place the flower heads in a large bowl together with the orange and lemon zest. Pour 1.5 litres boiling water over the elderflowers and citrus zest. Cover and leave to infuse overnight. Strain the liquid through a jelly bag, before pouring into a saucepan. Add the sugar, the lemon and orange juice and the citric acid to help preserve the drink and make it clear. Heat gently to dissolve the sugar, then bring to a simmer and cook for a couple of minutes. Once ready, use a funnel to pour the hot syrup into sterilised bottles. Seal the bottles with swing-top lids, then pasteurise for twenty minutes at 80°C. Even without pasteurisation I have had bottles last for several months, and enjoyed the cordial well into the autumn.

I’m entering this recipe for Four Seasons Food celebrating the vegetables of spring.  FSF is run by Anneli at Delicieux and Louisa at Eat Your Veg who is hosting this month.

45dad-fsf-spring

I’m also dead chuffed to be shortlisted in the FOOD category for the BIBS (Brilliance in Blogging Award). If you think I deserve to be in the final then please vote for me by clicking on the picture below. Thank you for all your support!

BiB Food 2014


Favourite Five Broad Bean Recipes

favorite fiveI’ve mentioned earlier this month that the first broad beans of the season are a real delight for me. I like the fact that you can plant a few beans in October or November and they emerge in the last of the autumnal sun, brush off whatever the winter throws at them, then rapidly grow as the days warm in spring. One single bean brings one plant, but a whole basket of harvested pods and countless beans. They are one of the easiest of crops to grow, only being slightly blighted by black fly and bird attack. I’ve found that overwintering the beans seems to cut down on the black fly attacks, but opens up the possibility of birds like pigeons feasting on the new shoots. So I often use a net to cover the plants in their infancy, and also pinch out the tops of the plants when the beans are formed; which I’m told reduces the chance of the black fly descending. As an ingredient the beans are perhaps at their best when small and sweet, although the larger beans work well when made into purees and we had amazing large dried and fried beans in Peru; a kind of Latin salted peanut.

Broad bean

Broad beans are a great ingredient and often make their way onto our plates. Here are my Favourite Five Broad Bean recipes.

Broad Bean Hummus – Cook 400g of shelled beans in boiling, lightly salted water till tender  about 8-10 minutes or so). Drain, cool and pop them out of their slightly grey skin. Whizz with a small sprig of mint in a food processor before pouring in a little lemon juice, and some olive oil as the processor blitzes. Continue to mix until smooth.

Broad Bean, Pea and Mint Tagliatelle  – This is perhaps our favourite spring/summer pasta dish. Start by blanching the beans   and peas (100g of each shelled). If the beans are young you don’t need to peel off the outer skin, but if older its worth the time. Take half of the beans and peas and whizz in food processor until semi-smooth. Finely chop a garlic clove and soften in some olive oil, add the whizzed pea/bean mix and cook for a minute or so. Add 200ml of double cream and the other half of the beans and peas. Stir in a handful of chopped mint and 75g grated parmesan. Add your choice of cooked pasta to the sauce, serve with a little extra parmesan sprinkled on top.

broad bean pea and mint pasta

Broad Bean Falafels – Place 500g podded broad beans in a food processor and whizz; add 1tsp. baking powder, small red onion, 1 clove garlic, handful of chopped coriander, parsley and mint, and 1 tsp. cumin seeds. Blend until smooth, adding a little lemon juice to help it break down. Add a little olive oil and then form into balls. Chill for a few minutes and then fry in oil until crisp, serve in a pitta with hummus and minted yoghurt.

Broad Bean and Chorizo Tapas – Cook the podded broad beans in salted water for 8-10 minutes, drain and peel off greyish skin. Meanwhile, slice a chorizo and fry in a little oil. Add the beans to the chorizo and spicy oil, toss for a few minutes, then add chopped flat leaf parsley.

Broad Bean, Pea and Feta Orzo Salad – Orzo, a delicate grain-shaped pasta, is quick to cook. Whilst it cooks, sauté 2 shallots, lemon zest, and some cooked peas and beans in a bit of butter. Combine the bean and pea mix with the pasta, some chopped feta, and a finely chopped mint. A great summer salad or side dish.

What ways do you use broad beans in your cooking?

I’m dead chuffed to be shortlisted in the FOOD category for the BIBS (Brilliance in Blogging Award). If you think I deserve to be in the final then please vote for me by clicking on the picture below. Thank you for all your support!

BiB Food 2014


The Macro Allotment

May is the month when plants spring into life and a trip the allotment always brings something new emerging from the ground. It’s the month when fruit forms and crops start to swell.

I’m dead chuffed to be shortlisted in the FOOD category for the BIBS (Brilliance in Blogging Award). If you think I deserve to be in the final then please vote for me by clicking on the picture below. Thank you for all your support!

BiB Food 2014


Taking the Sting Out Of It – Nettle Risotto

Nettles consume the phlegmatic superfluities which winter has left behind. Nicholas Culpepper 1653

nettles
Like many allotments, ours has the occasional weed. Indeed; we have, the last eight years, been battling an attack of bind weed, with occasional skirmishes with ground elder, nettles and goose grass. Many of these weeds were essential foods in Medieval times. People like Nicholas Culpepper knew the nutritional benefits of these now unwanted plants; they even put them in books such as The Fromond List (a list of ‘herbys necessary for a gardyn’), compiled by Surrey landowner Thomas Fromond in about 1525.

Across the world nettles for example are used in many dishes, from frittata, and a Scandinavian soup, to a version of the Greek spanakopita. The Italians seem to be particular fond of the humble nettle; so, as the nettle ‘crop’ at the allotment was looking particularly lush and fresh, I decided to make use of this foraged food for a risotto. Nettles are not known as Stinging Nettles for no reason, they have many hollow stinging hairs called trichomes on the leaves and stems, which act like hypodermic needles, injecting histamine and other chemicals that produce a stinging sensation. In order to avoid the obvious issue of being stung when picking I wore gloves and picked only the top few leaves, placing them straight into a last of bag as I did.20140430-082937.jpg
You will need
Two large handfuls of young nettle leaves
1 litre chicken stock
50g cubed butter
1 onion, very finely chopped
1 clove of garlic, finely chopped
250g Arborio rice
A small glass of dry white wine
50g grated Parmesan
A handful of toasted pine nuts

Start by blanching the nettles for a few minutes in boiling salted water, before whizzing in the food processor with a little liquid to make a purée. Next heat the stock, you want it to be just simmering so when you add it gradually to the rice it doesn’t reduce the temperature of huge dish too much and slow the cooking. In a thick bottomed pan, sweat the onion gently in a little butter and olive oil until it’s translucent and soft. Add the garlic and cook for a few more minutes, before adding the rice. Cook the rice for a few minutes until it starts to become slightly translucent, then pour in the the glass of wine. You want to let the wine evaporate until the onion and rice are nearly dry, then add stock, a ladleful at a time, stirring constantly, each time waiting for the liquid to evaporate before adding the next ladle.

Continue this process for about ten minutes, then add the nettle purée. Stir into the rice and continue to add the stock until the rice is al dente. When the rice is ready, add the cubed butter, seasoning and Parmesan and put the lid on the pan. Leave the risotto to rest for a couple of minutes, before beating the butter and cheese into the rice and serving. Sprinkle the toasted pine nuts on top and add a little more Parmesan and a drizzle of good olive oil.
Nettle risotto

Nettles are such a great resource, which as well as being nutritious and plentiful are free! Why not take the sting out of your food bill and give it a go. Any other suggestions for foraged greens?

I’m dead chuffed to be shortlisted in the FOOD category for the BIBS (Brilliance in Blogging Award). If you think I deserve to be in the final then please vote for me by clicking on the picture below. Thank you for all your support!

BiB Food 2014


I’m entering this recipe for Four Seasons Food celebrating the vegetables of spring.  FSF is run by Anneli at Delicieux and Louisa at Eat Your Veg who is hosting this month.

May at Plot 4

April is one of my favourite months. It’s the time of year when the garden, the allotment, everything is growing. We’ve had some cold and wet weather, but its been pretty sunny of recent weeks, and the sun has started to transform the plot.

The month that has just finished is the first of the year to have new produce to harvest, as well as the stalwart that is Swiss chard.  Only the other day we were able to pick the first few delicate broad beans.  I love harvesting the first of these beans, sliding my finger along the shell and opening it to reveal the lime green beans in their silken bed. To be honest, the majority of the crop is not quite ready, but my wife and I couldn’t resist a quick nibble on these sweet treats. We’ve also be harvesting a few radishes (the globe variety grown in boxes in the cold frame) and the first of the salad leaves.

I started sowing with enthusiasm during April, and this will continue into May with beans, peas, beetroot, chard, fennel, cavalo nero and cime di rapa all to sow. Every year I get excited by the coming of spring and good weather, sow a load of seeds and then have too many plants, then end up with a glut. I’m determined this year to sow successionally, so I’ll be curbing my enthusiasm and only sowing a few seeds every few weeks. This way I aim to keep the crops coming, but not have them coming out of my ears!

I’ve pretty much completed the big winter jobs at the plot. I’ve managed to get the fence fixed, water butts sorted and have even managed to construct a netted protection frame for some of the crops. During May I need to create another of these netted cloches, but without a doubt the major job for this month is weeding. The crops are growing, but so are the weeds. So battle commences again for the year!

Garden share collective badge

This post is contributing to The Garden Share Collective; an international group of bloggers who share their vegetable patches, container gardens and the herbs they grow on their window sills.


Time for (Mint) Tea

In out house we are not aversed to a cup of tea. In fact we drink a load of it throughout a typical day. Whilst I really enjoy a fine cup of Earl Grey (never with milk mind you), I like the idea of growing my own tea. Not blessed with a Himalayan climate here on the south coast, I’m not sure if it’s even possible (I know that there is a commercial tea plantation in Cornwall). So, I’ve decided to embrace the herbal tea and have turned excess spring mint growth into a warm, yet refreshing brew. It turns out that mint tea made with mint leaves (not from a bag) is not only easily made, but also infinitely more refreshing and clean tasting. It tastes so healthy that I had to find out what benefits it could be bringing me and it transpires it has some real health benefiting properties. As well as the obvious plus of being caffeine free, mint tea has long been recognised as aiding digestion, relieving stress and even helping with nausea. What’s more it’s the perfect drink to make at the allotment on a spring day.
mint tea
You will need
A cups worth of just boiled water
4 or 5 sprigs of mint (take the new growth as it’s the freshest)
Kettle or teapot

Once your water is boiled, place the mint leaves into your teapot and pour the water over the mint. Leave it to steep for 5 minutes or so before pouring into your cup to drink. I used a natty camping kettle with a strainer built in, but anything which allows you to filter the liquid would be fine. Pop a couple of mint leaves in your cup and sit back and enjoy a refreshing cuppa.

Mint tea and kettle

Torta Pasqualina – A Pie for Easter

Swiss chard is one of the heroes of my plot, and I’ve blogged about my love of it before. Its vibrancy always makes a visit to the plot a joy, but recently its been joined by many green shoots and leaves emerging all over the plot. Spring is such a great season and the prospect of new life and a season of growing ahead is an uplifting one. Although much is growing at the allotment, there is not a vast amount able to be harvested; and with Easter coming up I was looking for a dish which could combine some allotment ingredients and celebrate Easter at the same time. Cue the arrival of the Guardian the other day and Yotam Ottolenghi’s recipe for a Torta Pasqualina. It seems the Italians also have a need for an Easter dish which uses seasonal vegetables. The combination of chard and ricotta is always a good one, and having discovered Genius Gluten Free Puff Pastry recently its a dish I can make for the whole family. Here’s my recipe, loosely based on Ottolenghi’s.

Torta pasqualina

You will need (makes enough for 8)

2 tbsp olive oil
1 small onion, peeled and finely chopped
1kg Swiss chard (we have the Rainbow variety which adds great colour to the dish), stalks stripped and finely chopped, leaves shredded
2 sticks celery, finely sliced
Handful of parsley leaves, finely chopped
Small handful of new fennel tops, finely chopped
½ tsp ground mace
¼ tsp grated nutmeg
250g ricotta
50g parmesan
9 eggs
Salt and black pepper
500g Genius Gluten-free puff pastry
Gluten-free plain flour, for dusting

Start by sweating the onion for a few minutes until it is softened, then add the chopped chard stalks and celery. Continue to cook for a few minutes, before adding the leaves and allowing them to wilt. Take the pan off the heat, cool, then place the mix into a tea towel and squeeze out any liquid. The dryer the mix, the better it will hold its form later. Add the cheese, herbs, spices and 3 eggs to the chard mix and mix thoroughly (seasoning with a little salt and pepper as needed).making a torte pasqualina

Roll out the 2/3 of the pastry and use it to line a 20cm loose bottom cake tin. Place the chard mixture into the pastry case and make 5 indentations, breaking an egg into each, before rolling out the remaining pastry and making a lid for the pie. Trim the edges and then crimp them to provide a secure seal. Brush with  beaten egg and prick a few holes in the pastry, before placing in a preheated oven (180°C) for 45 minutes, until golden on top. Leave to cool and serve.

torta pasqualina


April at Plot 4

March has been a bit of a mixed bag at the allotment. We’ve had barmy, sunny, spring days; but also frost nipping at the young shoots of growth. I’ve started sowing then had to wrap things up as it became colder and colder. Its been a stop start spring. All this has meant that I’ve not really got myself sorted in terms of planning where I will plant everything, and even now I’m a bit behind the digging. On the plus side, after 9 years of having the allotment I have finally finished creating a fence around it all. The wonderful and free resource that is pallets has been my supporter in this task, and I’ve even used pallets to create a vertical salad planter.

The plot is still producing, though only a few of the vegetables from last year are ready for harvest at the moment. There is still Swiss chard of course, and we’ve used the last of the root vegetable supply recently to make some super delicious Homemade Root Vegetable Crisps. Perhaps the star of the show has been the increasingly frequent emergence of the ‘Allotment Salad’ on our plates. Its been a delight to sit down at lunch (once or twice outside even) to a vibrant salad of fresh leaves from the allotment. Teamed with a mustard dressing, they have really given this month a lift and convinced us it really is spring.

As I mentioned above I’ve been sowing with earnest and the tomatoes in particular are really developing well; they’ve been pricked out to one plant per module and I’m looking forward to potting them on during the month ahead.  I’ve already sown a few peas, but the majority of them have been snaffled by some small rodent visitors to the greenhouse. I decided to grow them in the greenhouse in order to avoid mice digging them up outside, but it seems I’ve been thwarted and they have followed the seeds into the glazed warmth. Not to be deterred, I’ll re-sow this month; and will do so in raised lengths of guttering to add a further obstacle into the path of my rodent friends. Whilst at the fabulous Weald Allotment shop I picked up some new 6ft tall climbing peas (a heritage variety called Telephone) to give a go. It will be interesting to see if we get many of the harvest peas home this year, they’re usually grabbed and devoured at the plot by the family before they get a chance to be put in the pot. April is also the time to start to sow winter squashes. They’re hungry crops, so need a good amount of manure and other organic matter to be put on the bed before they’re planted out later in the year. We’re going to sow Crown Prince again this year; but also a couple of Italian varieties, Pumpkin Marina di Chioggia and Pumpkin Padana. This selection should keep us going into the winter months. What winter squashes do you grow?

One of the big jobs last month was to finish the fence around the plot, but it does leave me with the task of painting it and also tying in the blackberry so that it is easily managed when the fruits form in the months to come. One of the last construction jobs to do is to create another cover to prevent birds eating the brassicas. I’ve got some old blue piping and I’m going to be constructing a hooped design to hang netting on. Hopefully the birds will then not compete with the mice for the amount of crops they can eat! As the soil warms up, so do the weeds and so one of the big jobs over the next few weeks is to give the plot a good weed and try to keep on top of those perennials which I don’t really want reappearing. The potatoes will go in to, although I think I’ll wait until the end of April for the majority of them, planting them in 15cm deep trenches about 5-6cm apart.

Garden share collective badge

This post is contributing to The Garden Share Collective; an international group of bloggers who share their vegetable patches, container gardens and the herbs they grow on their window sills.


Little Swiss Chard and Stilton Tarts

I love Swiss chard. There I’ve said it. It has to be my “go-to veg” when sowing at the allotment, if there is a space it’s filled with chard.  As a plant, it’s hardy and forgiving, and just keeps on going. Added to this, it has a beautiful form and, if you sow rainbow chard as I do, the colours are so vibrant. I remember being blown away by the chard at the Eden Project; they’d got it growing in rows like a bedding plant, and it was so beautiful. Swiss chard is also a great vegetable to eat; we just don’t eat enough of it in this country. In Italy, its appreciated more and both the leaves and the stalks are cooked extensively.

With a limited amount to harvest at the plot, Swiss chard has appeared regularly on the table (often in the form of a chard pilaf). The other day though we had some stilton leftover from something, so I combined the two ingredients in a little tart. Blue cheese has a natural affinity with chard; the iron rich leaves complimenting the twang of the cheese. Combined with the creamy blanket of the egg custard, it makes a delicious tart.

20140328-115017.jpg

You will need (makes 4 small tarts)
250g Swiss chard, washed and stems stripped from the leaves
150g Stilton (or any other strong blue cheese) chopped into small dice
2 eggs
2 egg yolks
350ml double cream
salt and pepper

For the shortcrust pastry
250g wholemeal flour
50g walnuts
125g unsalted butter
A pinch of salt
1 egg yolk
30ml (approximately) milk

Start by making the pastry (it needs time in the fridge to rest before being rolled out). Put the walnuts in a food processor and whizz until a fine powder. Add the flour, salt and butter and pulse until the mixture resembles breadcrumbs. Add the egg yolk, then (with the food processor going) slowly pour in the milk until the dough starts to come together. Remove from the bowl and knead a little before wrapping in cling-film and chilling for at least half an hour.

Roll out the pastry on a floured surface; you want it pretty thin to help get a crisp finish. Use pastry to line four 10cm deep tart cases, line with greaseproof paper and baking beans, and place in a preheated oven at 170°C. Blind bake for 15 minutes. Take out of the oven, remove the beans and paper, and lightly prick the base; before returning to the oven for a few more minutes until the base is dry but not too coloured. Increase the oven temperature to 180°C.

Blanch the chard in boiling water, drain, chop lightly and leave to one side to cool a little. Once cool, divide the chard between the four tart cases, topping each with a quarter of the cheese. Put the eggs, egg yolks, cream and salt and pepper in a jug and beat until smooth. Pour the custard over the filling of the tarts and bake in an oven for half an hour, or until they are slightly browned on top, but still have a slight wobble to them. Remove from the oven and serve warm (or indeed cold if you can wait that long).

20140328-115009.jpg

20140328-135658.jpg