Little Swiss Chard and Stilton Tarts

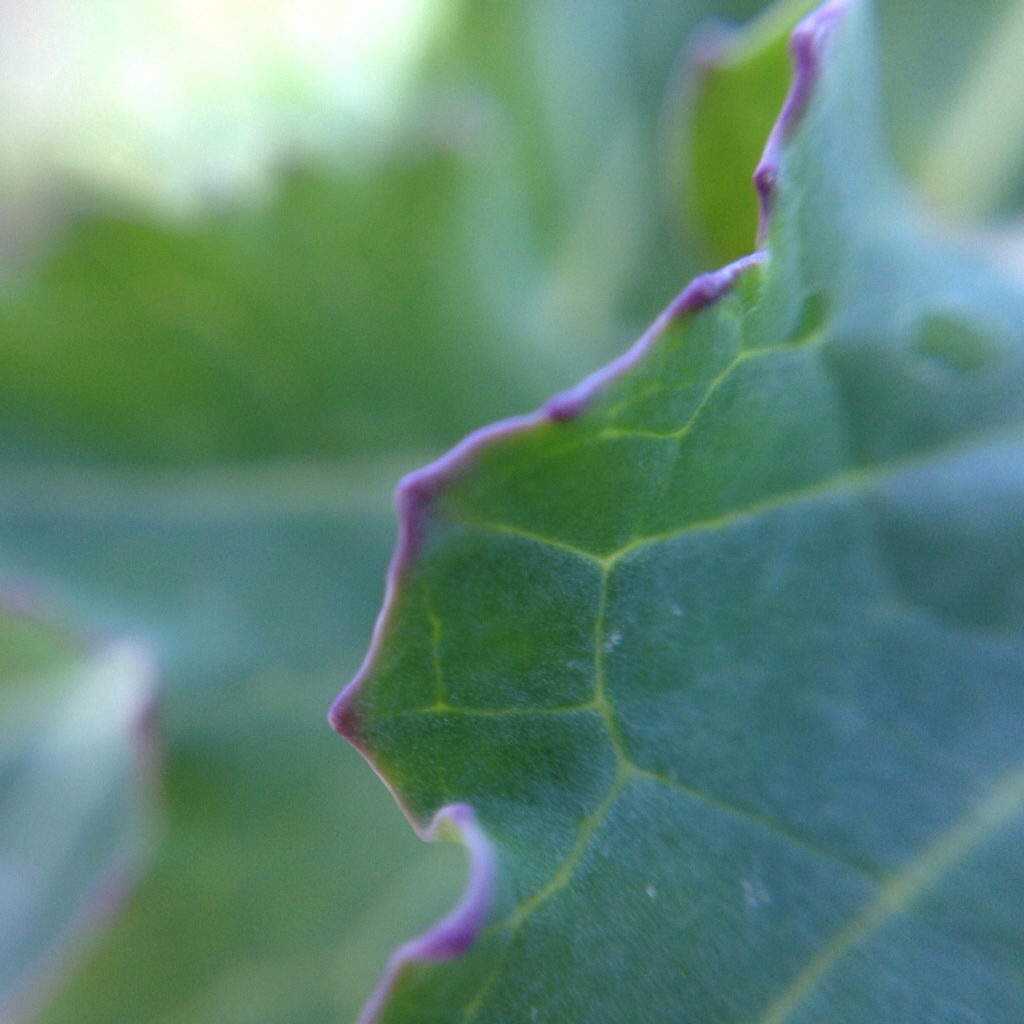
I love Swiss chard. There I’ve said it. It has to be my “go-to veg” when sowing at the allotment, if there is a space it’s filled with chard.  As a plant, it’s hardy and forgiving, and just keeps on going. Added to this, it has a beautiful form and, if you sow rainbow chard as I do, the colours are so vibrant. I remember being blown away by the chard at the Eden Project; they’d got it growing in rows like a bedding plant, and it was so beautiful. Swiss chard is also a great vegetable to eat; we just don’t eat enough of it in this country. In Italy, its appreciated more and both the leaves and the stalks are cooked extensively.

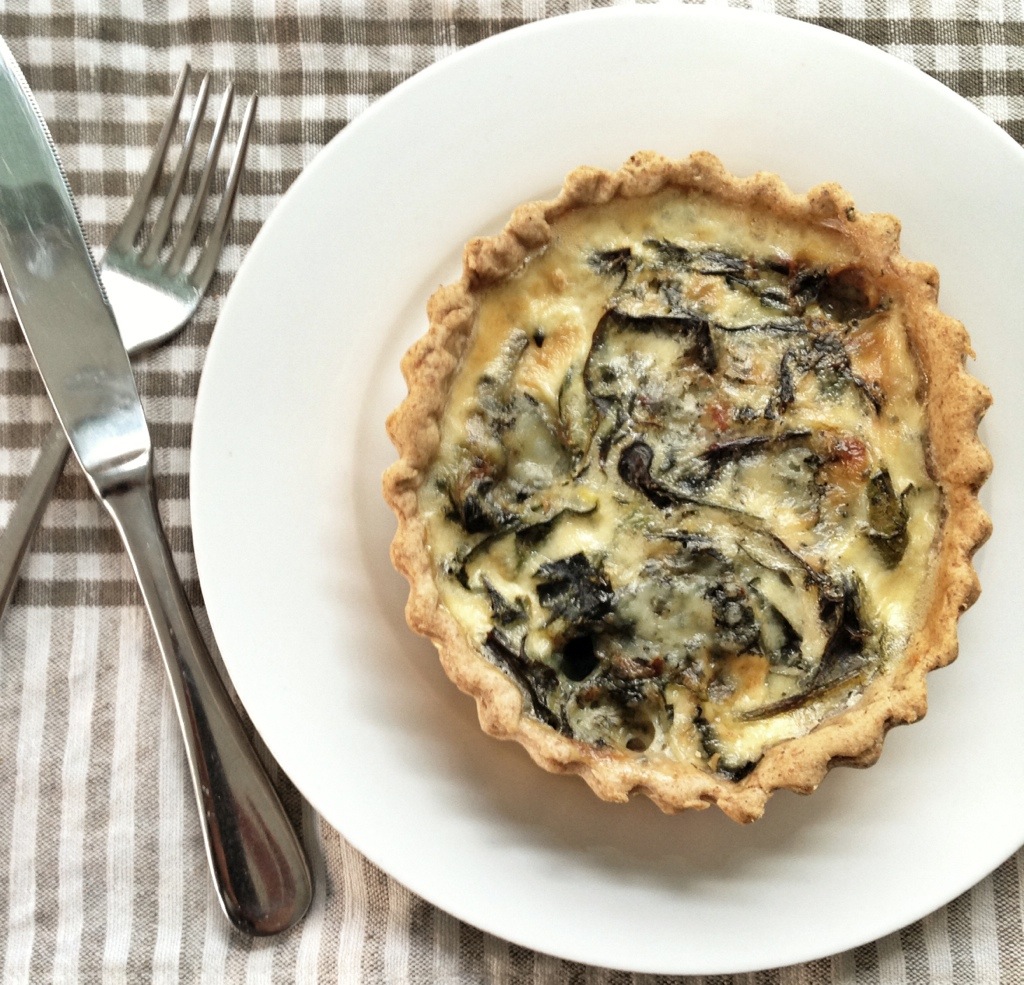
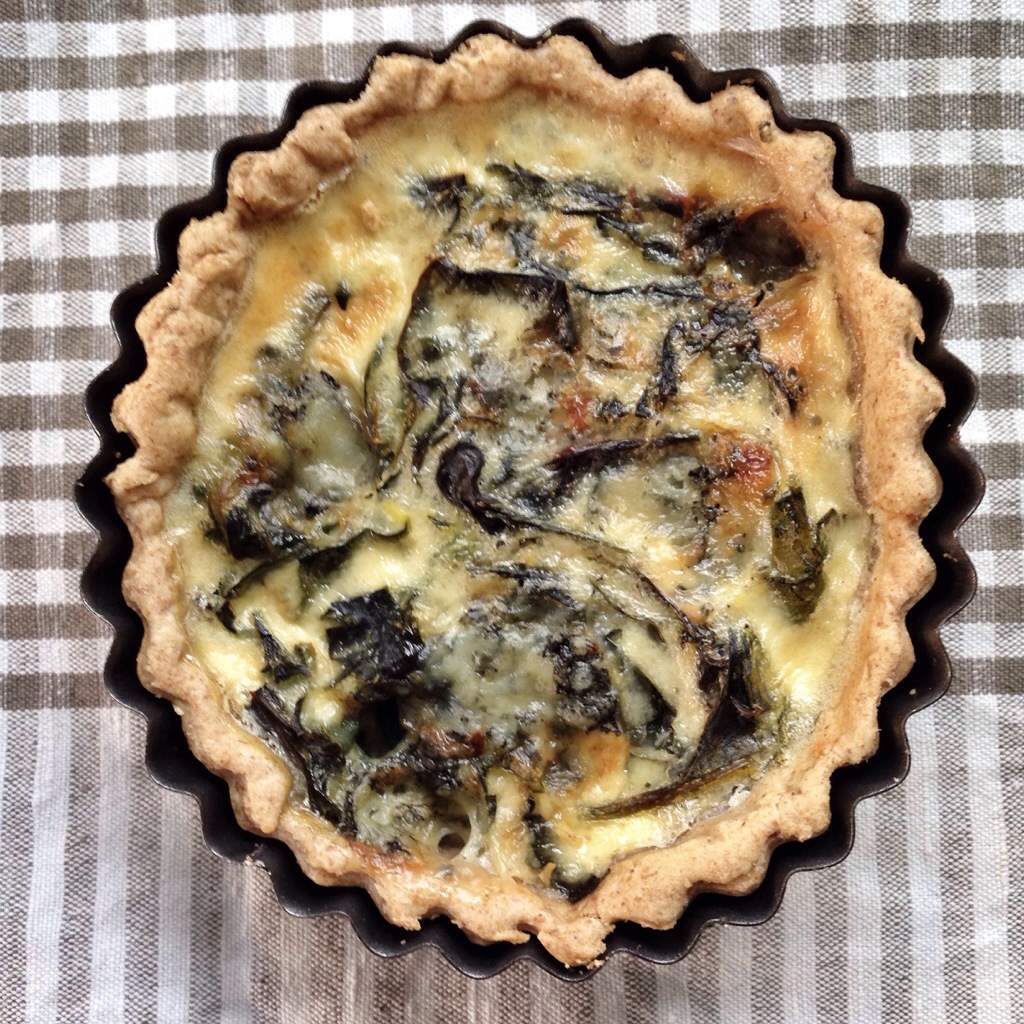
With a limited amount to harvest at the plot, Swiss chard has appeared regularly on the table (often in the form of a chard pilaf). The other day though we had some stilton leftover from something, so I combined the two ingredients in a little tart. Blue cheese has a natural affinity with chard; the iron rich leaves complimenting the twang of the cheese. Combined with the creamy blanket of the egg custard, it makes a delicious tart.

20140328-115017.jpg

You will need (makes 4 small tarts)
250g Swiss chard, washed and stems stripped from the leaves
150g Stilton (or any other strong blue cheese) chopped into small dice
2 eggs
2 egg yolks
350ml double cream
salt and pepper

For the shortcrust pastry
250g wholemeal flour
50g walnuts
125g unsalted butter
A pinch of salt
1 egg yolk
30ml (approximately) milk

Start by making the pastry (it needs time in the fridge to rest before being rolled out). Put the walnuts in a food processor and whizz until a fine powder. Add the flour, salt and butter and pulse until the mixture resembles breadcrumbs. Add the egg yolk, then (with the food processor going) slowly pour in the milk until the dough starts to come together. Remove from the bowl and knead a little before wrapping in cling-film and chilling for at least half an hour.

Roll out the pastry on a floured surface; you want it pretty thin to help get a crisp finish. Use pastry to line four 10cm deep tart cases, line with greaseproof paper and baking beans, and place in a preheated oven at 170°C. Blind bake for 15 minutes. Take out of the oven, remove the beans and paper, and lightly prick the base; before returning to the oven for a few more minutes until the base is dry but not too coloured. Increase the oven temperature to 180°C.

Blanch the chard in boiling water, drain, chop lightly and leave to one side to cool a little. Once cool, divide the chard between the four tart cases, topping each with a quarter of the cheese. Put the eggs, egg yolks, cream and salt and pepper in a jug and beat until smooth. Pour the custard over the filling of the tarts and bake in an oven for half an hour, or until they are slightly browned on top, but still have a slight wobble to them. Remove from the oven and serve warm (or indeed cold if you can wait that long).

20140328-115009.jpg

20140328-135658.jpg


Homemade Root Vegetable Crisps

Since my son’s diagnosis as coeliac we’ve had to take a look at everything we eat and see how it can fit in with a gluten free diet. With the sun showing a lot more of itself recently, the prospect of a picnic becomes a real one, and one which usually involves a bag of crisps. We don’t eat many crisps, but they kind of have to be involved in a picnic. The trouble is that many crisps seem to not be gluten free, due to different flavourings and being unable to guarantee that no cross-contamination occurs in the factory. As a result, we have a limited source of commercially available crisps (although PomBears are gluten free and were a favourite anyway). This, and the discovery of a rogue beetroot at the allotment when digging last week, led me to the decision to make our own. I can guarantee no cross-contamination; it’s my kitchen.

Vegetable crisps have been around for a while, probably since the mid-19th century when the potato crisp was also popularised, however they have never been a mass market snack. They are however, delicious. They’re also pretty simple to make.

root vegetables

You will need (for the equivalent of a large bag of crisps)
1 beetroot
1 large carrot
1 large parsnip
Oil for frying (I used rape-seed oil, but any mild flavoured oil is good)
Flaked sea salt

First, make sure the vegetables are clean and free of soil on the outside of the skin (they’re best with the skins left on I think). Using a speed peeler, peel thin slices of the vegetables to form the ‘crisps’. You’ll find that the initial peelings are usually a little too small, but as you get further into the vegetable they will become more of a suitable size. Once you’ve got a pile of shaved vegetables; it’s best to remove some of the moisture by placing them on a paper towel and pressing from above with another piece to absorb any liquid. This helps to give you a crisper crisp.

The next stage is to fry the crisps and to do this you need a saucepan of hot oil. I’ve never been a fan of deep frying things, but if you get the oil to a high temperature you don’t tend to get a greasy result; just a crispy one. So, heat some oil to 150ºC and fry the vegetable slices in batches (it’s probably best to leave the beetroot to last as it does give the oil a rosy hue) until lightly golden and crisp, 2 to 5 minutes per batch. When the crisps are crisp, remove them from the oil with a slotted spoon, allowing excess oil to drain away before placing the chips on a paper towel covered baking tray. Salt the hot crisps immediately and start the next batch of vegetables. Once you’ve fried all the crisps, toss them in a bowl and you’re ready to devour these moreish snacks.

Obviously, this recipe is adaptable. You can use lots of different root vegetables. Celeriac works really well, both as a snack, but also a garnish for soup. Parsnip or Jerusalem artichoke crisps on their own would be an excellent accompaniment to a simply roasted guinea fowl, or a steak. But of course, a bag of these makes a great snack for a picnic.

root vegetable crisps


20140411-194544.jpg

Peg Plant Labels

As the sown seed trays mount, knowing what is likely to emerge from them becomes increasingly useful. I’ve always used the standard white plastic type, writing on them with a Sharpie and cleaning it off each time I need to change the plant it marks. When clearing out a cupboard recently I found some old wooden clothes pegs. So, I decided to use some of my blackboard paint to convert them into plant markers. I like using natural materials, rather than plastic, whenever possible; the fact that I can move a marker to a different pot easily, or wash off the chalk writing is a bonus.

To make these plant markers is an easy process. Just paint the pegs with blackboard paint (I used a mix of dipping them in the paint and using a paintbrush), allow to dry, then write on them with a chalk pen.


There’s also still time to nominate the blog for Best Food Blog in the MAD parent blogger awards. To do so please go to http://www.the-mads.com/vote/ vote for a Best Blog of your choosing and then vote for Spade Fork Spoon as Best Food Blog. Thank you!

20140312-110850.jpg

Favourite Five Mustard Recipes

Spadeforkspoon Favourite FiveMustard is a great ingredient offering piquancy to many a dish. It is a member of the Brassica family of plants which has tiny round edible seeds as well as tasty leaves. Its English name, mustard, comes from a contraction of the Latin mustum ardens meaning burning must. This refers to the spicy heat of the crushed mustard seeds and the French practice of mixing the ground seeds with must, the young, unfermented juice of wine grapes. Although mustard was considered a medicinal plant initially, it has become a staple of many food cultures. Prepared mustard dates back thousands of years to the early Romans, who used to grind mustard seeds and combine them with wine to form a paste not much different from the prepared mustards we have today. It’s a store cupboard essential and here are my favourite five uses of mustard.

Mustard Soup  – This is a delicious soup which I first tasted in Amsterdam. It combines the piquancy and texture of wholegrain mustard with a silky smooth creme fraiche based liquor. Simple to make and a great winter warmer.

Cheese and Mustard Scones – Cheese scones are one of life’s little pleasures; especially so when served warm and the butter melted slightly on top. The addition of a little grain mustard really brings out the cheesiness, and gives them a slightly more sophisticated flavour. My son has recently been diagnosed as coeliac, so this recipe is for gluten free scones, but the addition of mustard to your usual cheese scone recipe would work. Combine 275g gf plain flour, 50g ground almonds, 3tsp baking powder, 2 tsp xanthum gum and 1 tsp salt in bowl and rub 100g butter into the dry mix to make breadcrumbs. Add 100g of whatever cheese you have around (generally cheddar and Parmesan in our case). Combine 2 eggs with a tbsp wholegrain mustard and 125ml yoghurt. Pour this into breadcrumb mix and bring the ingredients together with a fork. Turn the dough onto a floured surface and flatten to 3cm thick, before cutting out into scone shapes. Transfer onto a baking sheet, brush the tops with a little milk and grate a little more cheese on top. Cook for 10 minutes at 220 °C. Leave to cool slightly before eating.

Piccalilli – This has been my food revelation of the year. For years I’ve seen the yellow pots of Piccalilli on sale and thought they looked over processed and not too tempting. Then early in 2013 I had a dish in Bridport which had a delicious Piccalilli accompanying pig’s head croquettes. It just worked so well. So, when I had a glut of veg at the plot, I made some of my own and it’s been in constant use ever since. As well as vegetables from the plot, it uses a combination of English mustard powder and mustard seeds to make a simple punchy preserve.

Mustard mash – A simple use of wholegrain mustard to give the humble mash a bit of a twist. Boil, drain and mash your potatoes, before adding a knob of butter and a spoonful of wholegrain mustard. It goes brilliantly with sausages, but would work with other meats too.

Mustard and Honey Dressing – This is our ‘go-to’ dressing. Throughout most of the year we have a jar of this in the fridge. It’s speedy to make, lasts a few days, and really compliments a range of salad leaves. To make, just add the following to a jar with a screw-top lid: 3tbsp olive oil, 1tbsp lemon juice, 1 tsp Dijon mustard, 1/2 clove of garlic crushed, 1/2 tbsp honey, pinch of salt and sugar and a few twists of black pepper. Cap and shake vigorously to emulsify. It can be easily upsized for the summer months, when there isn’t a day that goes by without salad featuring on our plates.

mustard dressing
What ways do you use mustard in your cooking?


Roasted Jerusalem Artichoke and Cauliflower Soup – A Guest Post from @MissAmyPhipps

Recently my friend  of the fabulous Little Button Diaries recommended I check out one of her friends’ blogs. Amy blogs about her life; you’ll find recipes, craft projects, tips on gardening, and design inspiration. Amy and I met the other week and we decided to swap posts and write for each others blogs.

Here is Amy’ guest post. It looks delicious Amy. I’ll be giving it a go with the last of my Jerusalem artichokes.

Roasted Jerusalem Artichoke and Cauliflower Soup
The sun might be shining but let’s not forget it is only march and deceptively chilly in the shade… enough so to enjoy a hearty soup of a lunchtime. Especially when its harvest season for some of the most delicious root veg! I love cooking this recipe because not only is it jam packed with cold fighting ingredients, but yields enough for a dinner for the family or to fridge and last for 3 or 4 lunches. Fresh and creamy but totally vegan and gluten free!

Roasting the vegetables traps in their goodness and gives the most wonderful caramelised flavour. Do not be put off the slightly porridge look of the blended soup for what it lacks in visuals it makes up in abundant flavours!cauliflower and artichokes

You will need:
5/6 medium Jerusalem artichokes
A medium head of cauliflower (or half a giant one like the one pictured!)
1 bulb of garlic
1 red onion
1 white onion
1 lemon
A couple of good sprigs of rosemary
100ml rapeseed oil
2 litres of wheat free vege stock such as Kallo or Marigold
A food processor or good stick blender is essential!

To make the soup…
Pre heat your oven at 180 degrees. Chop the veg into medium sized chunks and muddle together in a large roasting tray. Break up your garlic bulb and throw it in with skins on. Fear not, roasting whole takes the edge of that zingy garlic flavour. Season with salt & pepper then drizzle all over with the rapeseed oil. The lemon really compliments caramel flavours of the roasted veg and livens up the whole recipe.
roasting tray and veg
Roast for an hour turning veg occasionally until edges start to crisp and go brown. Remove from the oven and leave to rest for 15 minutes or so.
roasted veg
Discard lemon pieces and remove the garlic cloves to peel their skins off before placing into your soup pan with the rest of your veg.
discarded lemon and garlic
Make 2/3 litres of stock and pour over the veg before blending thoroughly in a large pan. If your artichokes are too big to blitz with stick blender you might need to whizz them separately in a food processor! Re-heat and serve.
Roasted Jerusalem artichoke and Cauliflower soup
Enjoy!
My post for Amy’s blog about salad grown in a Pallet Planter can be found here.


Celeriac and Blue Cheese Soup with Celeriac Crisps

The celeriac at the allotment is far from ready; having been sown a few weeks ago, it is only just emerging from the seed compost. Nonetheless its a day for a soup today, and I bought a celeriac the other day; reduced to a matter of a few pence due to a rather unnecessary best before date. Celeriac teams brilliantly with blue cheese, and as if planned, I have a bit of Danish Blue cheese in the back of the fridge. I like to make use of all we have in the fridge and take great pleasure from managing to combine leftover bits into something delicious. The celeriac and blue cheese combine to produce a really smooth soup, but to complete the dish it needs something with contrasting texture. For a long while I’ve been interested in the idea of making vegetable crisps, so I experimented with celeriac crisps as a crispy garnish for the soup. It works well, continuing the flavour, but adding a different texture to the dish.

20140303-145013.jpg

You will need (enough for 4)
A small onion, finely chopped
1 clove garlic, finely chopped
750 g celeriac
1.5L stock (I had some chicken stock which I’d made from a roast, but vegetable stock would be good too)
50g blue cheese
Oil for frying

Slowly sweat the onion and garlic until softened and translucent. Meanwhile, peel the celeriac. Use a peeler to peel enough ‘crisps’ from the celeriac, before cutting the remaining root into dice. Put the peeled ‘crisps’ to one side and add the diced celeriac to the onions and garlic. Cook for a few minutes (you don’t want too much colour on the vegetables), then add the stock and simmer for 20 minutes or so, or until celeriac is tender. When the celeriac is soft, pour the contents of the saucepan into the food processor or liquidiser and blitz til smooth. Add the blue cheese and whizz a little more, before reheating.

20140303-145029.jpg

To make the crisp garnish, heat oil to a depth of 2cm and when the oil is at a hot enough temperature add the saved celeriac peelings. Cook for a few minutes until the celeriac starts to turn a little golden, before removing and placing on kitchen paper to absorb the excess oil. To serve, pour into bowls and place the crisps in the middle of the soup, a twist of black pepper wouldn’t go a miss.

March at Plot 4

February has been a pretty rough month here on the south coast. It seems its rained for most of the month and the allotment is wetter than ever. Still, the last week of the month has brought glimmers of spring and I’m writing this sat in my light filled kitchen with thoughts of seed sowing and the spring preparations in my head.

We are well and truly into the ‘hungry gap’ and I’ve only been able to harvest a bit of produce from the plot. The Swiss chard continues to be a stalwart and has provided us with many a meal over the last few weeks. The rocket and other salads have also been gracing our plates, recently teamed with a rather delicious tartiflette made by my wife. We still have some Jerusalem artichokes in the ground and they need to be eaten before they begin to sprout and start growing again. However hard you try you can never get all the tubers out of the soil, so you’re guaranteed a crop next year. Many of the artichokes have gone into a beautifully creamy puree to accompany fish or grilled meats.

Hopefully we have had the last of the winter storms and the weather will be warming a little; I’ve rebuilt or reglazed the greenhouse too many times this winter, and the greenhouse is bound to fill up this month as sowing starts with earnest. I’ll be sowing tomatoes in the greenhouse, bought from the fabulous Franchi Seeds (a little more pricey than some seed companies, but the packets are always packed with seeds and they have a great range of varieties so justify the few extra pennies). Like the celeriac of last month, the parsnips need a good length of growing, so I’ll be pre-germinating some seeds this month before sowing in plugs in the greenhouse.

Last month’s rain has meant that many of the jobs I wanted to get completed in February have not been finished. I potted up some strawberry runners at the end of last year and have been gifted some strawberry plants too. So, I need to prepare a new strawberry bed by digging in some manure and compost to give the plants the best start possible. Strawberries are such a good crop to grow, as they cost a bomb in shops, and are pretty simple to grow. Apart from protecting them from the birds later in the year, the only problem is managing to get them home to use in meals, rather than being picked and eaten there and then. Its not just beds for strawberries that need preparation, once the wet soil drains a little I need to dig in compost and manure and prepare the whole plot for the growing season. In particular, I’ll be piling manure onto the squash patch, so when I plant squash out later in the year they will have an abundant source of organic matter to gorge themselves on.

Garden share collective badge

This post is contributing to The Garden Share Collective; an international group of bloggers who share their vegetable patches, container gardens and the herbs they grow on their window sills.

Cod Cheeks, Jerusalem Artichoke Purée and Braised Peas

I got the fabulous Polpo cookbook for Christmas and spent the festive period drooling over the delicious dishes within it. One of the dishes I immediately took a fancy to was the Cod Cheeks, Lentils and Salsa Verde. Having never had cod cheeks, but being a fan of the Italian braised lentils the recipe is accompanied by, I set about finding some cod cheeks to give it a go. My local fishmonger (Fish on Shoreham harbour) stocked them frozen, as the demand is not high enough to warrant being on the slab every day. Easily cooked in a few minutes and relatively cheap, they’re one of those foods (like the ox cheek and breast of lamb) that are not used enough. In the Polpo dish, the sweet flesh of the cheeks contrasts beautifully with the acidity of the salsa verde.

20140227-130342.jpg

With things firmly in the ‘hungry gap’ at the allotment, one of the only crops I’m harvesting is Jerusalem artichokes. They make a beautiful cream coloured purée, which is a great accompaniment to white fish or sweet scallops. So the other day I combined the cod cheeks and the artichoke purée for a early spring supper.

You will need (serves 2)
For the Jerusalem artichoke purée
200g Jerusalem artichokes, peeled and chopped
water, to cover
30g butter
20ml double cream
A little lemon juice
salt and freshly ground black pepper

For the braised peas
Half an onion chopped
3 rashers streaky smoked bacon, chopped
100g frozen peas

For the cod cheeks and salsa verde
Parsley, mint and basil leaves (a small handful of each)
1/2 tbsp. each of capers and gherkins
1 tsp. Dijon mustard
1 anchovy
Enough olive oil to bring the salsa verde together into a pourable sauce
250g cod cheeks, cleaned of small pieces of bone
Chopped clove of garlic

For the Jerusalem artichoke purée, bring the Jerusalem artichokes to the boil in a saucepan and simmer until tender, then drain and allow to cool. Whizz the Jerusalem artichokes into a food processor with the butter, cream and lemon juice to make a smooth purée. When ready to serve, season the purée and heat gently to warm through.

To make the braised peas, heat a little olive oil in a shallow saucepan, then cook the chopped onion and bacon for 8 – 10 minutes until the onion turns golden and the pancetta is brown but not crisp. Turn the heat down, add the peas to the pan, then cover and braise for 5 mins until peas are tender. Add a dash of lemon juice, seasoning and a bit more olive oil, if necessary.

The salsa verde is simple to prepare. Finely chop the herbs, gherkins, capers and anchovy using a sharp knife and combine with the mustard and enough oil to make a pourable sauce. Put to one side for the flavours to mingle and mature. Season the cod cheeks with salt and pepper and fry in a little olive oil for 2 minutes on each side. In the last minute, add the chopped garlic and a little lemon juice.

20140227-195355.jpg

To serve, place a spoonful of artichoke purée onto each plate and smear a little across the plate. Top with the cod cheeks, followed by a drizzle of salsa verde. Scatter the braised peas around the plate.

20140227-195403.jpg

This post has been entered into Delicieux & Eat Your Veg March Four Seasons Food Challenge.

20140303-124341.jpg

Spring has Sprung

You make me feel so young
You make me feel like spring has sprung
Every time I see you grin
I’m such a happy an individual

Mack Gordon “You Make Me Feel So Young”

Spring is the season at the allotment when things start, and need to start, happening. Despite it not quite being March, every visit to the plot brings another shoot or stem emerging from the ground. Some seeds have been sowed, with many more to go, and new life is starting to peep out of the seed trays in the greenhouse.

My life is a little like the plot at the moment. Like the allotment, my emergence out of the dark and malaise of depression and anxiety is showing a few signs of life. As we enter spring I feel that I’m starting to turn a corner. I’m beginning to think about the future and what I might do with it. The allotment has shown me that I can succeed at things, but crucially my break from work has also taught me that I need a life that works for me and all the family if I’m to be happy.


Last week I found a jar of seeds saved from last year. Unfortunately they were a random mix of unknown seeds; but I’ll sow them and see what emerges. In a way I’m in a similar situation to the pot of seeds. Inside I have the potential to do a lot of things, but what will it be and what might stop me finding it? When will the shoots emerge, and what will it grow into, are still questions I ponder on.